
Local Storage · NAS Recovery
How I Recovered My UGREEN NAS—and What I Had to Rebuild
My move to a replacement DXP4800 Plus brought my shared folders back. Here is the recovery path, the warning that mattered, and why apps and sync needed their own attention.
Why I keep my files on my own hardware
I use a UGREEN NAS because I want my files on my own hardware, in my own space. A NAS is a storage device on your network. It gives me a central place for files, with access from my computers and phone.
That control matters to me. So does the responsibility that comes with it. I have to think about updates, access, and backups. Keeping files local does not make them safe by itself.
With this much data, a full backup is a big job. That makes me nervous. RAID 5 can keep the storage pool working through one hard-drive failure. It does not protect me from every mistake, deleted file, ransomware attack, or disaster. I still need a separate backup.
A replacement unit, and a successful move
A problem with my NAS led me to UGREEN tech support. It took time to work through the issue. They sent a replacement DXP4800 Plus, and I paid a deposit as part of that process.
UGREEN came through for me. The migration finished, my shared folders came back, and the system was up and running again.
That was a good result. It was also only part of the job. Apps such as sync were lost, and the sync setup needed to be rebuilt. I cannot yet call this a fully verified recovery of every file and app. My earlier update also listed DNS, the network name lookup, as a reconnect task. Its completion is not confirmed here.
My setup was a replacement UGREEN DXP4800 Plus with four 20-terabyte hard drives in RAID 5, plus two 1-terabyte NVMe solid-state drives in a mirrored RAID 1 read-write cache. The cache was still attached to the old storage pool. That detail shaped the recovery.
Before following these steps
This is the recovery path for my support case, along with the preparation and checks I would want around a move. It is not a claim that I completed every check listed below. Your drives, software, and support instructions may be different.
For planned hardware maintenance, UGREEN’s cache guidance says to remove the SSD cache safely in the system before physically removing the drives. My cache had not been removed. Support approved a different recovery path that kept both original cache drives. Do not treat my exception as the normal swap procedure.
1. Save settings and record the app setup
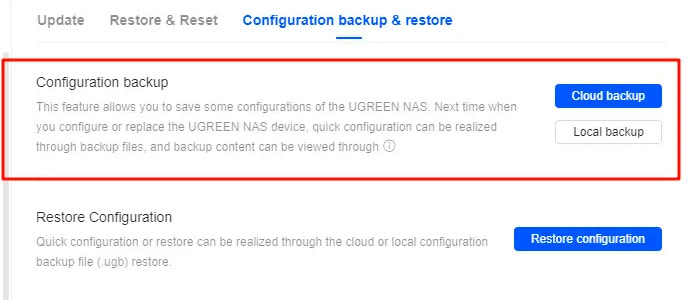
If the old NAS is still accessible, open Control Panel, then Update & Restore, then Configuration backup & restore. Choose Local backup and keep the downloaded .ugb file on your computer. UGREEN’s settings guide explains what the backup includes.
Treat that file as a settings backup. It is not a backup of your documents, installed apps, Docker data, or all app settings. Those need their own protection.
Before a swap, I would also record the app list, shared-folder paths, users, and permissions. For each sync job, save the source folder, destination, direction, schedule, and deletion rules. Keep those notes somewhere other than the NAS.
2. Power down and preserve the drive order
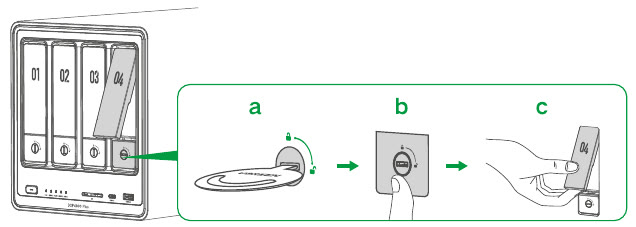
Stop file transfers and shut down normally. Unplug power before opening the unit or moving drives.
Record each hard-drive bay and SSD slot. For my support-approved move, the original drives needed to stay in their matching positions in the replacement unit. Label them before taking them out.
Do not add blank drives, create a new pool, or improvise a cache change as part of this recovery. If the detected layout does not match your notes, stop and check with support.
3. Refit the original SSDs and their thermal pads
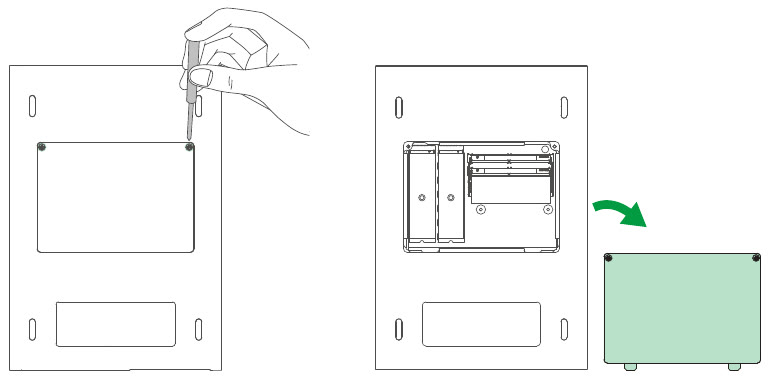
With the power unplugged, open the bottom cover and secure both original SSDs in their original slots.
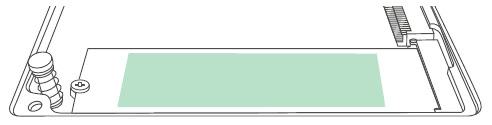
Remove the protective film from both sides of each supplied gray thermal pad. Place the pad on the exposed face of the SSD, toward the bottom cover, then refit the cover. These are SSD cooling pads.
Follow the layout in the DXP4800 Plus manual. If your SSD has a separate heat sink or the fit is different, have support confirm the arrangement.
4. Use the recovery path for the existing pool
UGREEN tech support reviewed my old log and the detected cache. For this case, support told me to keep both SSDs in their original slots and select “This storage pool has an SSD cache and cannot be removed.”
A read-write cache can hold new writes before they reach the hard drives. That is why the cache matters during recovery. My mirrored SSDs provide cache redundancy; they do not add file-storage capacity. UGREEN explains the cache types here.
If a screen asks you to format drives, initialize storage, or delete the old cache, stop and contact support. A guide for creating a new cache is not a guide for recovering this existing one.
5. Take the conversion warning seriously
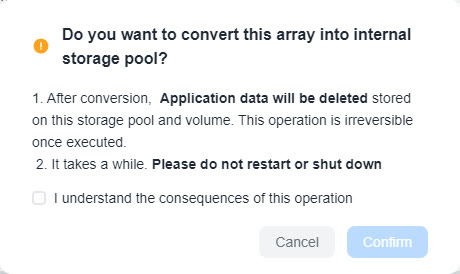
The screenshot at the top of this article is my actual warning screen. It says application data will be deleted and that the conversion cannot be undone. That warning deserves a careful read.
Support reviewed the screen and my retained-cache situation. The migration later completed and my shared folders returned. The picture shows the warning before confirmation; my later update is what confirms that the move finished.
Only proceed with conversion when the detected pool and warning match the recovery path approved for your case. During conversion, do not restart, shut down, or remove drives.
6. Restore settings, then check what came back
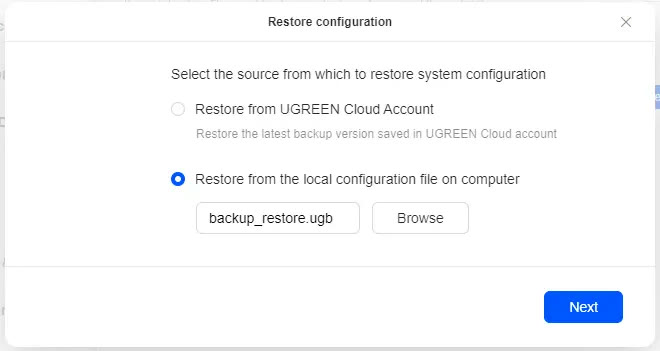
Use the saved .ugb file to restore supported system settings. Review the selected items and check the result. The local restore instructions show where to choose the file.
Restoring settings and recovering the storage pool are separate steps. Neither is proof that all apps or sync jobs are back. Network settings may also need attention after the hardware change.
7. Reconnect daily work a little at a time
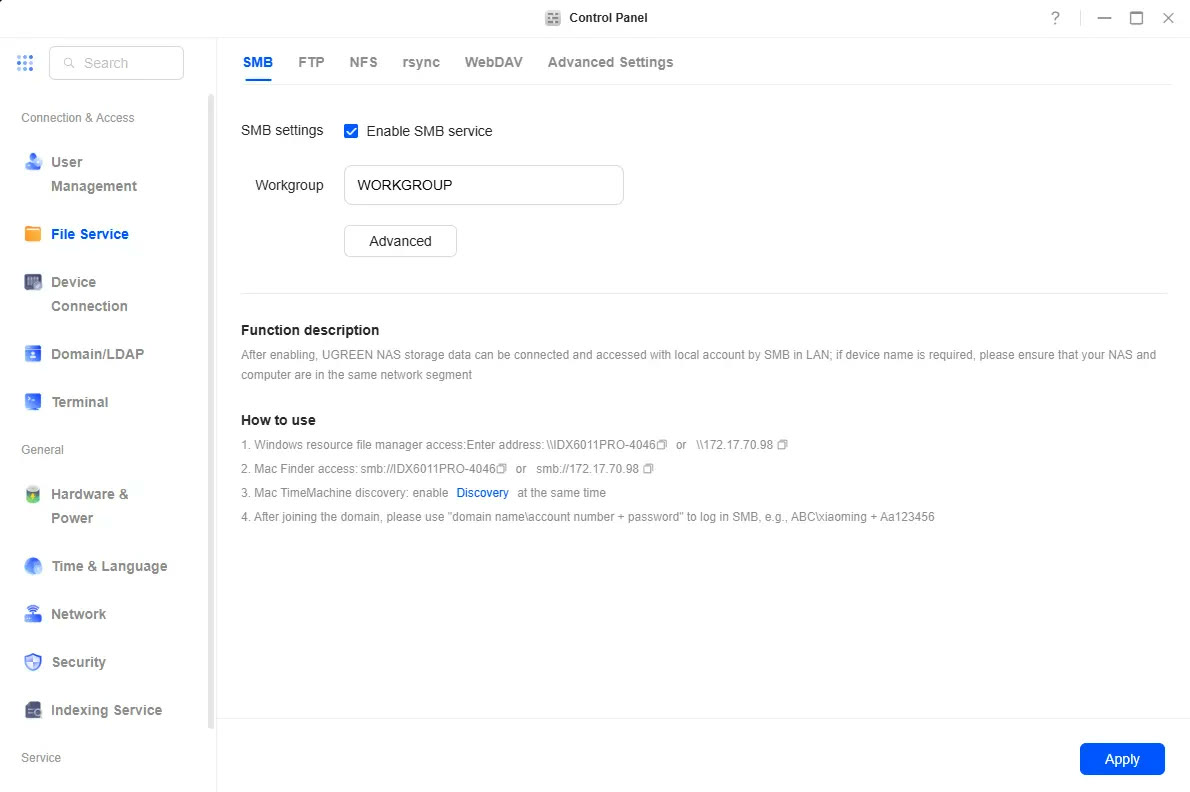
My shares returned, but I still needed to rebuild the app and sync setup. These are the checkpoints I would use before calling the rest complete:
File sharing: reconnect the Mac to the original shared folders. Check the paths and permissions. Open representative files before trusting the connection for daily work.
Sync & Backup: reinstall the app and rebuild jobs carefully. Confirm the direction, folders, and deletion rules. Test a small folder before resuming a large job.
iPhone photos: reconnect Photos Backup to the intended NAS folder. Keep existing photos and check where a new test photo lands.
Photo AI: check the original photo folders and supported recognition features in Photos. Rebuilding the library setup is separate from confirming that the original files are safe.
UGREEN has separate guides for Mac file sharing, computer sync, phone photo backup, and photo categorization. Screens and available features can vary by software version.
A small test is a useful first check. It is not a full audit of every file. I would keep recovery checks and normal sync work separate until I know each job is using the right folders.
What I would do differently next time
I would keep a recovery folder outside the NAS. It would hold the settings backup, the drive layout, the app list, and the details of every sync job. Those notes can make a replacement much easier to work through.
I would also plan the backup around what I could least afford to lose. RAID helps with one kind of hardware failure. A separate backup gives me another way back when the problem is something else.
Most of all, I would treat the return of my shared folders as a milestone. Files, settings, apps, and sync jobs each need their own checks.
I still value having my storage in my own infrastructure. I also appreciate UGREEN tech support for helping me get this system running again. This experience reinforced what ownership means to me: control over my files, and a clear plan for taking care of them.
At CNERD.AI, that is the kind of practical thinking I want to bring to storage and private-AI projects. Visit CNERD.AI to talk about your setup.